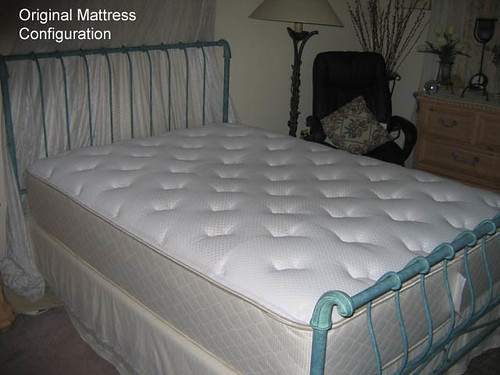
The First CutOne morning last September I got out of bed and decided this was the day I was going to perform mattress surgery. I’d had my Spring Air Back Supporter Luxury Firm for fifteen months and it had started to go soft and unsupportive at nine—not that it was ever really all that comfortable to begin with. I’d had to bolster the lumbar area with a couple of pieces of remnant carpeting covered by a flat feather pillow and some half inch HR foam. I was tired of sleeping on a ridge. For months I’d been working up the nerve to cut open an expensive piece of bedding, and after waking up early yet again with lower back pain I made up my mind. It was time.
Thanks to Jimsocal and TheQuest I had seen a couple of mattress surgeries on the Forum and had a good idea of how to go about it and what to expect. Jim and TheQuest used a different approach than the one I decided on. Jim removed the welting and eventually the entire top of the mattress. TheQuest made her incision on the bottom and slipped off the top and sides like a box top. I wanted to retain the top and be able to open it like a suitcase—mattress kit style, since I thought that would afford me the best degree of functionality for moving things around inside. Using an X-acto knife I punched a small slit in the side of the mattress just under the welt. Then I cut around on three sides with a scissors. It was tough going since there were a lot of liners and batting to cut through but eventually I had a nice clean incision below the welt and was able to flip the top open like a big suitcase.
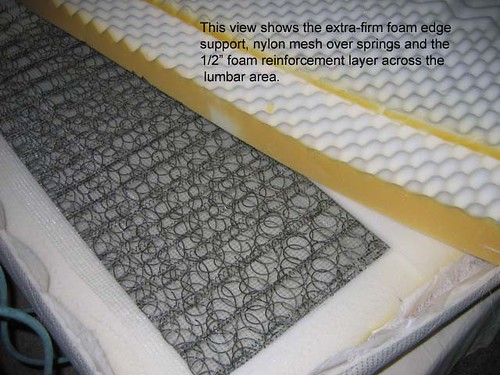
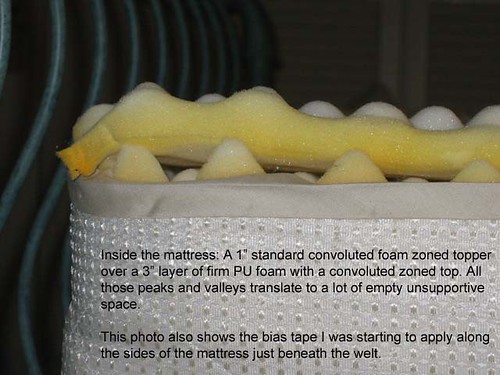
Under The HoodThe mattress surgeries I’d seen were both performed on Sealys from Costco, and I was expecting to find several thin layers of cheap PU foam and a fiber mat over the springs. But once I got under the hood I found that Spring Air makes them differently. Just beneath the cover was a 1” layer of zoned convoluted PU foam that looked no different from an eggcrate topper you could buy at any store. But under that was a single 3” piece of firm base foam with a convoluted top that rested over the springs and a 3” wide ledge of very firm edge foam that encased the spring unit.
That kind of threw me off my game since I’d intended to remove most, if not all of the PU foam and replace it with a 1” medium latex topper and a 2” 4lb memory foam topper over the fiber mat and the springs. Except… there wasn’t even a fiber mat. Just the two pieces of foam. Well… when the going gets tough the tough go to lunch—which is exactly what I did. And when I returned I decided to remove all the PU foam anyway and go ahead with my original plan.
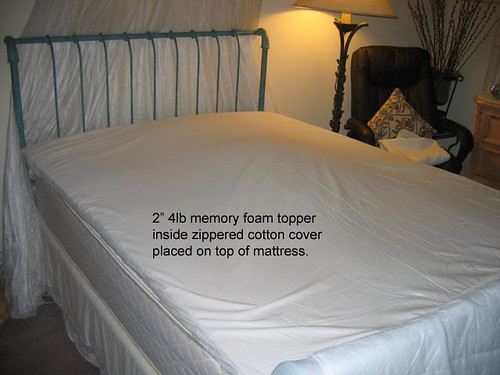
I removed the PU and popped in the latex and MF, closed the cover and lay down. Whoa! Way too soft! So I swapped the 2” MF for the 1” version from Overstock.com. That was better. In fact it felt very nice. And even though there was only half the amount of foam inside the cover than there was before visually it was barely noticeable due to the amount of foam sewn into the cover. I attached three Velcro tabs to hold the cover in place, slipped my mattress pad over the top and made up the bed feeling very accomplished. The newly configured mattress felt so much more cushy and comfortable than the original—which had always seemed hard but not really firm—just sort of mushy and not supportive enough.
If It Sounds Too Good To Be True… I continued to enjoy the new surface for the rest of the day—reading and later on, watching TV. Unfortunately when I woke up the next morning I had a really bad backache. The kind of backache I hadn’t experienced since I returned a Talalay latex mattress to SleepEZ. I knew immediately the mattress was now too soft and not rigid enough to properly support my lower back. How confusing. Less foam. More pain! Not really what I was expecting.
Feeling a bit discouraged I put the carpet remnants back on. Under the foam this time rather than on top of the cover the way I’d had it originally. But with less foam beneath it all it seemed to do was make the mattress so hard on my hips it was painful and I just couldn’t sleep on it. When I started this I thought it was going to be an easy fix but now all I could think of was a line from an old Monty Python sketch—“This redistribution of the wealth is trickier than I thought.”
Unwilling to choose between a backache or bruised hips, in disgust I put everything back the way it had been. It seemed I had cut my mattress open and gone to a lot of trouble only to find I was no better off than before. This thing had me stumped. I had to think about it a bit.
And Now For Something Completely Different…At first I wondered if the spring unit itself had too much give to be properly supportive, but actually with the carpeting in place the mattress felt rigid enough. There was absolutely no sagging. More and more I began to suspect the problem resided in the soft, squashy foam sewn into the cover. Eventually I decided it would have to come out.
But that was a real project. The most difficult, time consuming, back breaking aspect of the entire process. I worked on removing the stitching from the quilting for weeks, a little at a time. My back wasn’t up to tackling the entire thing in one sitting—or rather one standing—along with a lot of bending and straining and leaning over while I worked on it with a seam ripper. Honestly. I don’t know whose brilliant idea it was to sew all that deep tufting into mattress tops in the first place. To me it feels like sleeping on a lumpy old mattress and I hated it from day one. Sticking a memory foam topper over it only made it marginally better.
Eventually I had taken out all the tufting except for a few stitches here and there that were sewn down too tight to remove without damaging the cover. All that remained was to cut out the foam. It was about two months before I got around to that.
Version 2.0When I started this project I thought it would be a piece of cake—take off the existing PU, replace with some latex and memory foam and voila—instant bliss. When that didn’t happen I became a little discouraged and lost my enthusiasm for the task. I needed to step away from it for awhile and rethink my strategy.
One evening I was reading the Forum and came across Chris137’s reference to a featherbed. That got me thinking. I’d been sleeping on a feather pillow for months now. In fact I’d been sleeping on a feather pillow on my old mattress for years. Wouldn’t a featherbed be just like a big pillow? Suddenly I really wanted to find out. My enthusiasm had resurfaced. And the timing couldn’t have been better because Kohl’s had a terrific price on just the one I wanted the day after Thanksgiving. But there didn’t seem to be any point to putting it on the bed until the soft squishy foam had been removed from the cover. So I was finally motivated to tackle that.
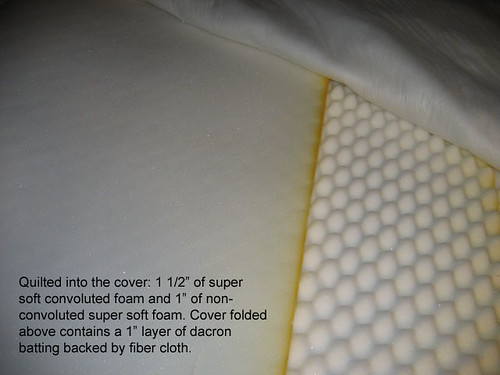
Using my trusty X-acto knife I make an incision on the underside of the cover just above the stitching that ran along the welting. When it was big enough the get my finger under I felt around to determine what I had to cut. The back of the cover was lined with fiber cloth. Underneath that were two layers of extremely soft PU foam. One flat 1” piece and an 1 ½” piece of the ubiquitous convoluted foam. I cut along the edge with a scissor. It was slow going cutting through 2 ½” of foam and a layer of fiber cloth and my hand was really sore by the time I finally finished. Surprisingly removing the remaining stitches of tufting that had been so hard to remove in the first place was the easiest part. They put up no resistance at all when I took a seam ripper to them. And finally the foam was out.
I had thought at that point I would have a thin, limp piece of knit material left as a cover, but I discovered it was still backed by yet another layer of fiber cloth with about an inch of batting behind it so the cover still had some body.
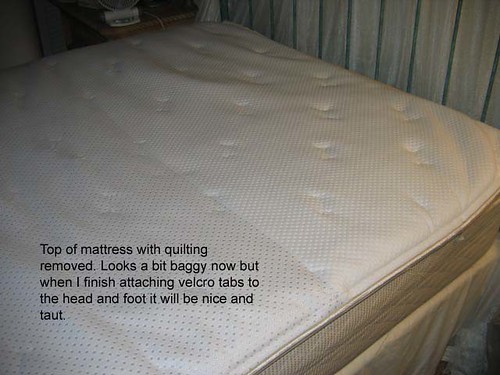
The whole thing took about 90 minutes and my back was really killing me from all the bending and straining. All I wanted to do was get the bed made up and lie down. But first I had to see what the mattress felt like with all that soft foam gone. Actually it felt quite firm. Hard in fact. I was elated. Now, I thought, we’re getting somewhere.
On went the featherbed and over it the 1” Overstock.com MF topper. With everything secure beneath a mattress pad I made up the bed and lay down. At first I was a little surprised to find myself sinking into the featherbed. My objective was to have a layer of firm, compressed material on the bed, but I knew from sleeping on a feather pillow that it would quickly mash down once the air was pressed out of it, so I rolled around the bed for a bit making sure it flattened out evenly. I guess I liked the feeling of it because I was so pooped from working on the mattress that I actually fell asleep for about a half hour just testing it out! Later that night when I got into bed I turned over on my side and went right to sleep.
I really thought this was it—at last. I had found the winning combination. I loved the way it felt and I loved being free to roll anywhere I wanted without the constraints of sleeping on a narrow section of mattress firmed up with carpeting. But I few days later I started waking up with lower back pain and I knew it was just too soft.
The carpeting went back on but it was difficult to locate under the 2” featherbed and a 1” MF topper, and it wasn’t giving my back enough rigidity. The discomfort in my lumbar area just seem to get worse every day until after two weeks I conceded that no matter how much I liked the way the mattress felt it was just too soft for me. I hated to return it, but the last thing I needed was yet another unused topper cluttering up my closet.
Without the extra soft foam in the cover the mattress was now so firm that I was able to put my 2” 4lb memory foam topper on. Now the bed felt cushy without feeling smooshy. I left the carpeting in place under the feather pillow because my back was bothering me, but without the extra cushioning underneath it was so hard that it hurt my hip and I was finding it difficult to fall asleep. After a couple of nights of that I widened the gap between the two sections so that my hip rested in the space between them but I still had the extra firm support along my ribcage and shoulder where I liked it.
I wasn’t sure if this was going to work either. I’d tried so many things and failed to find a comfortable solution each time, but once I spaced the carpet remnants I found that not only was my back feeling better each day, some mornings I was actually so comfortable and cozy I was reluctant to get out of bed! This arrangement felt pretty good—better than the mattress had ever felt before, but I still wasn’t completely satisfied. I really wanted to get the bed to the point where I could dispense with the carpeting entirely and still strike the right balance between support and comfort. I began to focus on the one remaining layer of convoluted foam between the cover and the 3” base layer of firm foam.
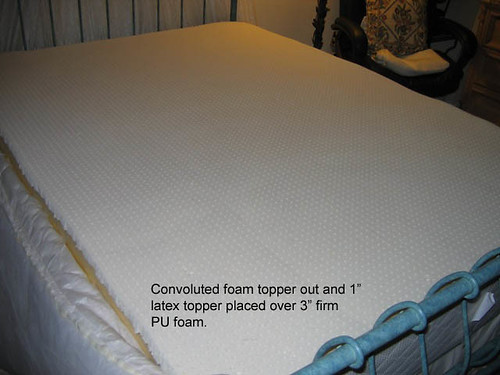
And The Winner Is… Back when all the regulars on the Forum were snapping up the 1” Natura latex toppers from Brylane I got one too even though I’m not a fan of Talalay and buying a latex mattress had been an unmitigated disaster. I still liked the idea of latex—in small quantities and combined with other materials. I always knew I would use it some day, although every time I had tried to use it on this particular mattress it had made the bed feel way too soft and unsupportive. Still, now that I had removed those 2 ½” of soft squishy convoluted foam from the quilting I was ready to try it one more time. So off came the 1” zoned convoluted PU eggcrate that came with the mattress and on went the Brylane topper over the 3” firm PU layer.
At first I wasn’t really sure I was going to like it because it did make the mattress noticeably softer, but unlike previous attempts it no longer seemed to interfere with the support, and it didn’t give me a backache. And because the latex was under the cover and isolated from my body by a layer of batting, 2” of memory foam and a mattress pad the jiggly Jello character of Talalay was completely canceled. All that was left was a really nice soft surface that cradled my body comfortably. At last I had achieved the coveted Ahhhh Factor. Admittedly things aren't perfect. I still have lower back issues. I had them before I got this mattress and I’ll have them long after it’s gone. Because of that I opted to keep the carpeting on one side of the bed because my back gets stiff while I sleep and rolling over onto a really firm rigid surface to work the kinks out beats rolling off the bed and lying on the floor—particularly on a cold winter morning. Hey, you do what you have to… But now I can get into bed at night, get comfortable and quickly fall asleep. I no longer find myself waking up early tossing and turning with a backache. In fact, some mornings I’m so comfy I don’t want to get out of bed at all. And that’s something I haven’t had the pleasure of feeling for a long time.
The winning configuration from the bottom up is: Open offset innerspring unit inside foam encasement 3” firm PU foam with zoned convoluted top (guestimate: 35-38 ILD) 1” Talalay latex (guestimate: 26-28 ILD) Mattress cover with 1” of batting 2” 4lb memory foam on top of mattress
Remarks On Spring Air Mattress Construction: I don’t know if this is true of all Spring Air mattresses, but once I’d cut mine open and looked inside I was rather impressed with the way it was put together. I’d seen a few dissected Sealys and the construction looked pretty crappy: Thin layers of raggedy looking foam, flimsy looking foam encasement. Even the spring unit looked cheap. I was expecting to find the same sort of thing inside this Back Supporter but the mattress actually looked as nice on the inside as it did on the outside. It was nicely finished with a lot of attention to detail in a place most people would never get to see.
On the other hand, Spring Air makes a lot of their “reinforced” center third which is supposed to provide better support where most of your body weight is. This leads you expect heavier gage coils in the lumbar region, but I found no evidence of this at all. The coils appear throughout. The “reinforcement” seems to be nothing more than the use of “zoned” convoluted foam, and even this is not true zoning, just a different arrangement of convolutions and an additional ½” piece of non-convoluted foam laid across the center of the mattress over the springs.
At Spring Air they just love their convoluted foam. This mattress has plenty of it. Just about every piece of foam is convoluted. My question is why? I can’t tell you how much better it feels since I replaced most of it. (Actually I just did.) Particularly the super soft convoluted foam quilted into the cover. All those peaks and valleys just squash down and provide no support and really no comfort whatsoever. And don’t even get me started on the current trend of puffy tufted mattress tops. What is the point of buying a new mattress if it’s going to feel like a lumpy old mattress? Just removing the tufting was an improvement in itself.
Finally, it’s a sad commentary on the state of today’s mattress industry when you have to cut open a mattress that’s not even two years old and replace just about everything inside of it because it has failed to provide comfort and support much beyond the one year mark. But that’s pretty much the rule these days rather than the exception. I slept on my last Spring Air mattress for 20 years. I couldn’t even go two years on this one.
Photos hosted by Flikr This message was modified Feb 6, 2009 by cloud9
|


|
He told me to put it under the mattress on top of the box spring. That's pretty easy. I've done it with foam to try to get more hip support. kait |
| If you have a true box spring placing something solid between it and the mattress really will make the bed feel firmer. On the other hand if you have a foundation which is already a solid surface, it won't make any difference. |
|
Hi Cloud9, Thank you for posting all of the pictures of your mattress surgery. I knew you'd get the picture posting figured out. Wow. You really are a tinkerer! It does look like you're working toward getting it closer and closer to what will work for your individual body's needs. I'm sure some of the many people reading these posts can relate and will benefit. I agree that it is a very sad state that a 2 yr old mattress will lose its effectiveness and resiliency. We need to keep talking about it and getting this word out, way past this little forum. Maybe we can make a difference if we tell what's true - people will listen. It might take years, but this trend toward less and less value can be stopped. We as consumers do have the power. Bill |
|
"The First Cut"??? At first I thought I was in a Clavell novel and someone was about to commit Seppuku! I always respect anyone that tries to home engineer a commercially made product so best of luck. Our personal experience with store sold and big name mattresses is that you guys sure can't do any worse. Unfortunately, all I could do with a scapel to our mattress is create a huge puddle on the floor since it has no springs and no multiple pads of foam or feathers - just water - and I can't un-ravel and re-stich cause and alas, no material except 25 mil. vinyl. Drat the luck - maybe seal-a-meal could work - but won't be necessary cause we found "sleep like the dead" occurs every night for both of us on the venerable waterbed mattress. Seriously, I hope the do-it-yourself layering pays off with a good night's sleep so don't let me throw water on your efforts. Best Wishes |
| Hi Cloud9, thequest here. I decided to check in to see what was up. So you did it! I'm so happy for you. I think you did the right thing. I personally understand you taking off the cover and undoing all those eyelets. I am still sleeping well. I don't think of my bed anymore. I sleep fine. So glad you did it. You will inspire others too. Take care, and I will check in another six months to see if you are still happy. |
| Thequest: What mattress setup are you happy with? Do you have pictures? I tried to find them, but couldn't. |
|
Bill -- So far so good. You might think with 2" of MF and 1" of latex this mattress would be pretty soft, but actually it's not. The base foam underneath is really firm, almost hard. In fact it would be too hard without the softer foam on top of it. It has a nice balance now. I would still prefer 12 gage springs like I had in my old mattress, but I have to admit, I rather enjoy lying in bed now and my back has been feeling much better. So yeah, a lot of work, but it was worth it. Of course, the way things are built these days, I may have to replace the base foam in 6 months, but I expect the latex and MF to last a bit longer. Hey Allison, I'm glad you checked in and saw my post. You and Jim inspired me to go for it and I'm glad I did. Happy to hear you're still comfy on your mattress surgery. And I'm glad someone one else gets it about the tufting. Awful stuff. I LOVE having a completely flat top to sleep on. No more lumps or bumps! Imjay -- Tell the truth. You're the owner of the last surviving water bed store from the 70s aren't you? This message was modified Feb 18, 2009 by cloud9
|
| awesome work. many thanks for sharing . |
|
Great post. Just for the record, I did start out leaving the top quilted piece of the mattress on with my 3 mattress surgeries thus far, leaving one side uncut. But I always ended up cutting it off and getting rid of the quilted piece. To me, they just don't feel good at all once they're cut so that the tension no longer keeps them taught. I thought you had too much foam on there, but if it works it works. If things don't work out I'd try replacing the 3" of firm pu foam with 1 or 2" of firm Talalay. My next set of springs will most likely be offset. I think those are what I need. Good luck! |
|
I would love to know if you are still happy with your set-up. Have you changed anything? I'd love to know if yours was a long-term solution! Thanks :) |